A garage can go from tolerable to miserable fast. In July, the air sits heavy around the workbench, and one afternoon of staining, painting, or running a small engine leaves the whole room smelling like solvent. The right fan for garage ventilation will not turn an attached garage into an air-conditioned shop, but it can move heat, humidity, and contaminated air outside instead of letting them settle into your house.
I have worked in enough garages to know the usual mistake: someone buys a cheap box fan, points it toward the open garage door, and calls the problem solved. That moves air, but it does not provide reliable exhaust. A better setup has an intentional intake path, an exhaust fan rated for the location, and controls that keep the system useful through changing seasons.
Start with the garage, not the fan catalog
Before shopping, measure the room. Multiply length by width by ceiling height to estimate cubic feet. A 24-by-24 garage with an 8-foot ceiling contains 4,608 cubic feet. For general heat and odor control, a practical target is roughly four to six air changes per hour, which puts that example in the neighborhood of 300 to 460 cubic feet per minute, or CFM.
That does not mean you need one giant 460-CFM fan running constantly. A 300-CFM exhaust fan used with a cracked side door or filtered wall vent can make a noticeable difference while using less electricity and producing less noise. If you weld, spray finishes, or run gasoline equipment indoors, the hazard changes. General garage ventilation is not a substitute for source capture, outdoor work, or proper respiratory protection.
Look for a fan with a published CFM rating, not just a vague claim such as “high velocity.” Sones tell you about noise, while watts indicate electrical use. A quiet 200-CFM fan can be more pleasant than a screaming 500-CFM model you stop using after a week.

Where to install a fan for garage ventilation
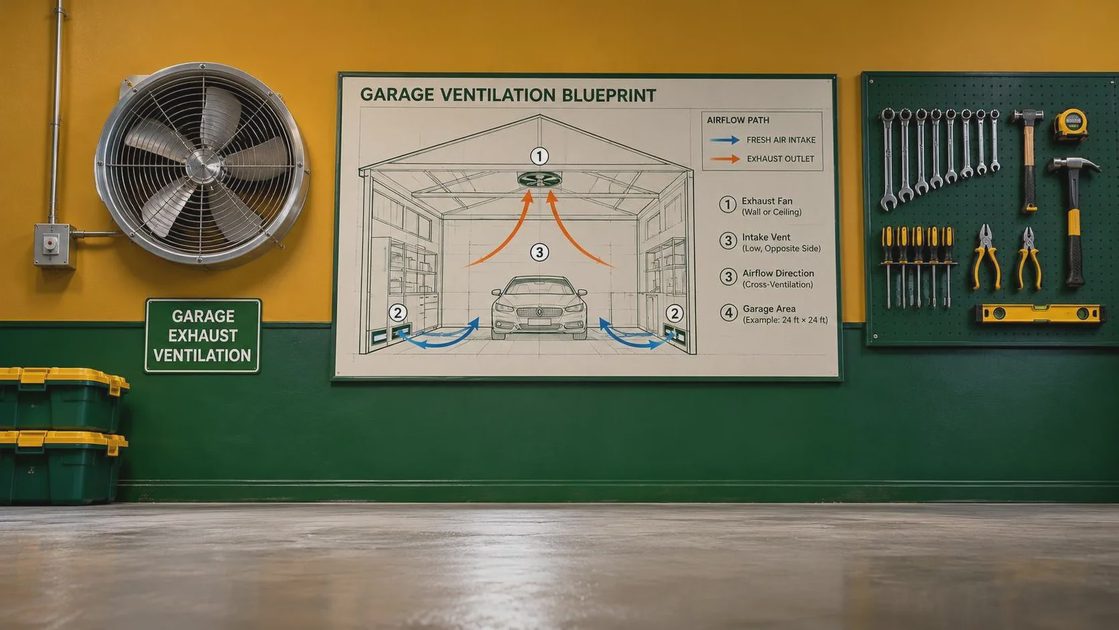
Exhaust location matters more than most homeowners expect. Hot air collects near the ceiling, so a high wall or gable-mounted fan is usually effective for summer heat. If your main problem is vehicle exhaust or solvent vapor, place the exhaust path where it can draw air across the work area and out of the building, without blowing directly through occupied rooms.
For an attached garage, I prefer exhausting through an exterior wall rather than into an attic, soffit, or shared ceiling cavity. Cutting into the garage wall requires careful sealing around the housing. Use a backdraft damper so outdoor air, insects, and winter wind do not pour through when the fan is off. A louvered exterior cover with a screen keeps the installation tidy without choking the airflow.
You also need replacement air. A fan cannot remove 300 CFM from a closed box indefinitely. It will pull air through door cracks, weather gaps, and the least desirable openings, sometimes creating pressure problems in the house. A dedicated intake grille low on an exterior wall or a controlled opening near the garage door gives the exhaust air a predictable route.
Match the setup to your actual work
A basic parking garage has different needs from a woodworking shop. If you only need to clear summer heat, a 200- to 300-CFM wall fan with a thermostat can be enough for a two-car garage. A thermostat set around 80 to 85 degrees can start the fan before the room becomes unbearable.
For sawdust, the fan should not be your primary dust collection. A shop vacuum with a cyclone separator and a tool-specific dust port captures particles at the source. Exhausting dusty air outdoors can spread fine dust onto siding, neighboring property, or attic spaces. I use the fan for residual heat and odor, not as a replacement for collection at the table saw or miter saw.
For finishing work, choose a fan and motor appropriate for the product and location. Flammable vapors can ignite from switches, motors, extension cords, or other electrical equipment. Read the product safety data sheet, keep ignition sources away, and do spray finishing outdoors or in a properly designed booth when the coating requires it. A standard residential exhaust fan is not automatically explosion-proof.
Wiring, controls, and safety details
This is where a clever weekend installation can become a bad electrical job. Use a listed fan, follow its installation instructions, and have a qualified electrician handle new wiring if you are not comfortable identifying circuits and making enclosed connections. A garage often has damp concrete, metal tools, and overloaded receptacles, so protection and grounding matter.
A wall switch is the simplest control. A timer works well when you want 20 or 40 minutes of clearing after sanding or using adhesive. A thermostat handles summer heat, while a humidity controller can help in a wet climate. I like a switch with an indicator light because it prevents the classic mistake of leaving the fan running all night in January.
Do not place the control where it will be coated in overspray or buried behind storage. Keep the fan guard intact, maintain clearance around the blades, and clean the grille every few months. A layer of sawdust and oily grime can reduce airflow and create a maintenance problem.
What I would buy for a typical two-car garage
For a normal 20-by-22 attached garage used for parking, storage, and occasional bench work, I would start with a 250- to 350-CFM wall exhaust fan, a backdraft damper, an exterior louver, and a filtered intake. Budget about $150 to $300 for the fan and exterior parts, then another $150 to $400 if an electrician needs to add a switch or circuit. A thermostat or timer can add $25 to $75.
If the garage has a finished ceiling, spray foam, or masonry walls, installation labor can cost more because access is harder. Do not select a roof fan simply because the roof seems convenient. It can work, but flashing, weather sealing, and service access make the job more involved. For most homeowners, a sidewall installation is easier to inspect and repair.
Brands such as Broan-NuTone, iLIVING, and Suncourt offer common residential ventilation options, but model specifications matter more than the logo. Compare rated CFM, noise, housing size, motor type, warranty, and whether the damper is included. The fan for garage ventilation should fit the way you work, not just the square footage on a sales page.
A practical installation checklist
First, mark the exhaust location high on an exterior wall and confirm that no wiring, plumbing, or structural framing is in the way. Second, identify the intake route so the fan does not simply pull air from the house. Third, cut the opening carefully, install the housing level, and seal the perimeter with an appropriate exterior sealant.
Next, install the damper and exterior cover, then connect the control according to the wiring diagram. Test airflow with the garage door closed but the planned intake open. Hold a strip of tissue near the intake and exhaust; it should show a clear, steady path rather than random turbulence around the door.
Finally, run the system during a warm afternoon and listen from inside the house. Excessive vibration often means the housing needs isolation or the fan is mounted out of square. Label the switch, clean the grille, and install carbon monoxide detectors in the home according to manufacturer guidance. Ventilation helps, but it does not replace safe vehicle maintenance or CO detection.
A well-sized fan for garage ventilation is a simple upgrade with a noticeable payoff: less stale air, faster heat removal, and a workshop you are more willing to use. I painted my own garage floor before solving the air problem, and the room still felt wrong. Fix the airflow first, then build the rest of the shop around it. I've screwed this up so you don't have to.
Back to the bench.