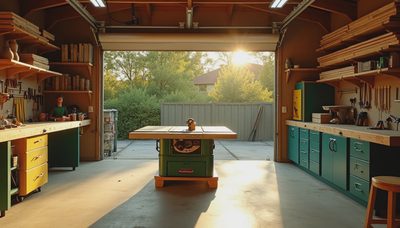
If your garage bench is buried under chargers, boxes, and a random coffee can full of screws, work bench shelves are the fix I reach for first. I have built a lot of garage storage over the years, and the pattern is always the same: once the wall above the bench gets organized, the whole shop feels twice as big. The trick is not stacking everything high. The trick is putting the right things within arm reach and keeping the bench clear for actual work.
I learned that the hard way in my own garage. I once built a pretty setup with a big open bench and almost no overhead storage. It looked clean for about a week. Then the battery chargers, layout tools, tape measures, glue, and spare fasteners started spreading out until I had no place to clamp a board flat. That is when work bench shelves stopped being a nice-to-have and became the backbone of the whole space.
Build around the tasks, not the clutter
A garage bench should support projects, repairs, and the kind of half-finished jobs that live in real homes. If you set the shelf too low, you keep hitting your knuckles. Too high, and every small item turns into a hunt. My sweet spot is usually 18 to 22 inches above the benchtop for the first shelf, then a second shelf only if the wall is tall enough and the owner actually has enough gear to justify it. That gives room for a drill charger, a small parts tray, or a vise without making the bench feel boxed in.
I also like the shelf depth to stay honest. Twelve to sixteen inches works for most garages. Go deeper and people start stacking junk two rows back, which sounds efficient until you need the one thing hiding in the rear. Good work bench shelves make the wall useful without swallowing the bench. They should catch the everyday stuff, not become a second attic.

Materials that hold up in a real garage
For a shelf that sits over a bench, I usually start with 3/4-inch plywood or a solid frame topped with plywood. Thin particleboard is cheap, but once humidity swings hit it, the edges get ugly fast. In a Midwest garage like mine, that matters. I have seen shelves sag because somebody saved $40 on material and then loaded them with paint cans, drill cases, and a stack of vintage tool boxes.
If I am building from scratch, I like a simple ledger screwed into studs with a front support tied back to the wall. Spax or GRK construction screws are plenty for most of this work when they are going into real framing. If you want the shelf to carry more than hand tools and small bins, locate the studs carefully and do not assume drywall anchors are enough. For work bench shelves, the wall behind them is doing the real work. The shelf is just the surface.
A clean finish helps more than people think. One coat of primer and a tough paint or poly makes dust wipe off fast. I have used unfinished plywood, too, but it drinks spills and shows grime quickly. If you are building a garage shop you actually plan to use, finish the wood once and save yourself a lot of scrubbing later.
How I lay them out so they stay useful
The layout starts with what lives on the bench every week. Battery chargers, impact drivers, sanding blocks, glue, bins of screws, and a small radio all deserve a place. The stuff that stays there should be light enough to grab quickly and heavy enough to stay put when the garage door opens and closes in winter. That is where work bench shelves earn their keep. They make the daily tools visible without forcing you to pile them on the benchtop.
I like to leave one open section above the middle of the bench for tall items or a task light. If you jam shelves wall to wall, the shop starts feeling cramped. A gap for a miter gauge, a tall clamp rack, or a hanging cord makes the whole setup easier to live with. I have also found that clear space is what keeps people honest. If every inch is filled, the shelf becomes a dump zone. If there is breathing room, the good tools stay where you can see them.
Mistakes I have seen, and made, too
The biggest mistake is building too much shelf before the bench proves itself. I have torn out storage that looked smart on paper but blocked clamping, shadowed the work surface, or made it hard to stand close enough to plane a board. Another common miss is using the shelf as a place for heavy bulk storage. A box of tile, a stack of oil jugs, or a half-dozen paint buckets belongs somewhere lower and more secure. Save the overhead space for items you need often.
The second mistake is forgetting lighting and outlets. If the shelf blocks a receptacle or leaves the bench under a bad shadow, the whole area feels awkward. I like to rough in outlets before the shelf goes up and keep the underside open enough for a strip light or task light. That small detail matters more than fancy trim. A clean bench with bad light is still a bad bench.
A simple setup that works for most homeowners
If you want a garage layout that feels calm instead of crowded, keep the wall above the bench divided into three zones. One zone for power and charging, one for hand tools and daily carry items, and one for small parts or project overflow. That is the difference between a storage wall and a working wall. Good work bench shelves support the job instead of competing with it.
For most homeowners, the best version is not complicated. Use sturdy plywood, mount it into studs, leave some open wall, and keep the heaviest gear lower in the room. If you add a pegboard strip or a magnetic tool bar under the shelf, even better. That keeps screwdrivers, pliers, and bits from drifting across the bench. I have seen $150 worth of lumber turn into a far more useful shop than a fancy cabinet setup that ate half the wall.
When somebody asks me where to start in a garage makeover, I usually say start above the bench. A straight, solid shelf line changes how the whole room works, and it is one of the cheapest upgrades you can make. Get that right, and the rest of the shop gets easier to organize. I have screwed this up so you don't have to. Back to the bench.